
|
|
| |
It is not difficult to find one......at least not if you are in Western Europe and if you accept a right hand drive car. The "Car and Classic" website lists many, eBay usually has several cars listed simultaneously, the two 'DS420 Owners' Facebook groups show regular offers, and R&J Cars (Scott Harrington) is a good source for restorable cars. See my web links page for references to all these. Copart in the UK is a good address for project cars, which they describe as "salvage". They auction an enormous volume of cars, think of hundreds of thousands each year, and thus their offerings change daily. DS420s show up regularly. Price and quality of all these offers show an enormous variety: from very good to "for parts only". The best choice for you as a potential buyer depends upon your personal circumstances: if you have deep pockets you buy a young and very good car at a high price, although these are more and more difficult to find. If you are good at restoring cars (especially a car's body) you may start with an old car for an initial purchase of just a few hundred GB-pounds. But, as one can imagine, you must take your time to search. Let it be clear: patching up a car (any car) does not have to be expensive, but if you want to keep a DS420 in a structurally sound condition it is a very expensive car to own: expensive in time, expensive in money, or both. Apart from that, it is very thirsty as well. DS420 cars are popular in the wedding hire business. The model fully deserves this popularity! But from an economical point of view it is not easy to match the income from such a business to the cost needed to keep the car structurally sound. Unless the owner of the business has emotional ties with the car, and thus invests extra time and effort, the general pattern is that a car is patched up just good enough to shine on the wedding pictures. New panels are welded over the old ones, new filler and paint is sprayed over the old layers, but the rust sticks up its ugly head over and over again. Finally, the battle is declared a loss, and the car is sold to crazy people like me and -possibly- you. In euphemistic seller's jargon this is sometimes expressed as: "car needs some TLC: Tender Love and Care". |
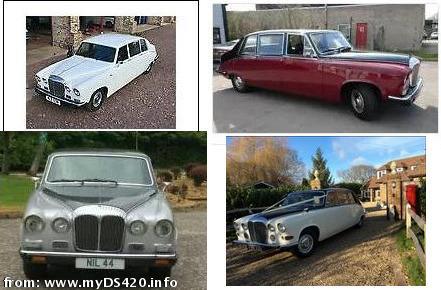
These cars (and more) are offered on eBay over and over again, each time with the same photo but with a different seller. Draw your own conclusions. Click here for a gallery of eBay screenshots |
, above jacking point, looking forward")
Rust, rust, rust! Rust! This car is tin worm food.
If parked outside in an average wet climate,
it may take less than two years to get affected beyond repair.
The mechanical parts of the car (engine, transmission, brakes, etc.)
are not too difficult; more on that below.
But the body is an entirely different story.
It is a common pattern that the buyer of a DS420, once he has taken ownership and has inspected the car in more detail, discovers that it has a lot more rust than was anticipated at first sight or, worse, than was to be expected from the seller's description. I am inclined to say that this is a rule almost without exceptions. Be prepared.
For starters, please have a look at the series of photos of the restoration of George Zdanko's car, or at the large (very large!) series of photos of the restoration of the bottom part of my own DS420: wheel arches, jacking points, door panels and sills. The photos give a rare opportunity to see how these body parts may look from the inside. The weakest places are:
, above jacking point, outer body skin removed") It is not uncommon for the rotten patches above the front jacking points
to have eaten away part of the car's floor near the feet of the driver.
You must look below the carpets of the driver compartment,
especially near the front edge of the doors and near the accelerator pedal.
It is not uncommon for the rotten patches above the front jacking points
to have eaten away part of the car's floor near the feet of the driver.
You must look below the carpets of the driver compartment,
especially near the front edge of the doors and near the accelerator pedal.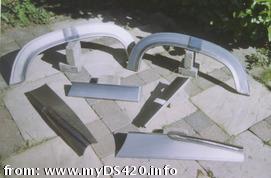 When you go for an inspection: bring a magnet, a very good torch (to see),
and a hand-pick (to poke).
Be prepared to lie on the ground to have a look under the car.
If your hands and your cloth don't get dirty, the inspection can not be good.
When you go for an inspection: bring a magnet, a very good torch (to see),
and a hand-pick (to poke).
Be prepared to lie on the ground to have a look under the car.
If your hands and your cloth don't get dirty, the inspection can not be good.
A DS420 may not suit you in the literal sense of the word! It was designed for the owner in the back. Can you image the driver of a prestigious dignitary mimicking a sack of potatoes behind the wheel? So: the driver's bench forces you to sit up with a straight back. Remember: you're just a servant.
In magazine articles shown on this web site (e.g. this article from 1984) the lack of comfort in the driver's compartment is discussed over and over again: rigid, small, noisy, stuffy and hot. Especially the cars up to 1985, with the fixed front bench, are infamous. The separate chairs introduced in 1985 at least brought some possibility to adjust the seating position. These chairs can move under the division wall, thus gaining an extra two inches of distance, which makes quite a difference.
The brochures tell about the adjustable steering wheel. Indeed, the steering column consists in part of two concentric tubes, and they shift in and out over a distance of roughly three inch. This spans the range between "too close" and "much too close". If you are taller than 1.85 meters (6 ft), or if you have a fair belly, then make sure that you're able to shoehorn yourself behind the wheel at all before buying the car.
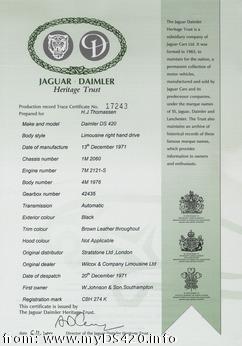
For a young car in top condition, UK prices seldom go over GB£10,000.- If a car fetches higher, it invariably is because it has had a famous previous owner. Never believe any "Royal Connection" before you have seen documented proof of such a claim. Allegations like e.g. "kept on board the Royal Yacht Britannia for use by the Queen Mother when travelling abroad" are plain nonsense. If a statement from the previous owner is the only "proof" you have. you may as well forget about it. The serial numbers of the few DS420 cars sold to royalty are all documented, and the Jaguar Heritage Trust can help to find out more. This is a paid service, but the costs are peanuts compared to the price increment that sellers put on a "royal" car.
An "average" car in roadworthy condition can cost anywhere in between GB£2000.- and the above price. Remember: the earliest DS420s date from 1968, but the youngest ones from 1992, which is a 25 year difference! Obviously, cars from the late eighties are more expensive than cars from the late sixties are. If you can not drive the car home on its own wheels, then pay between GB£500.- and GB£2000.- The price tag will keep rising much faster than you expect after you come home, íf you come home.
Don't get fooled by eBay auction prices. If you follow DS420 cars on eBay consistently over a longer period (as I have done on a daily basis for many years), you will notice that most cars are relisted several times within a few month. This is more the rule than the exception! A high price at the close of the first sale is usually made by a rogue bidder, or "time waster" as they are called in eBay lingo. Another possibility is that seller and highest bidder have agreed (during the bidding, by separate communication) that the sale would be subject to inspection, so the bidder could get an impression about the accuracy of the description. Then you know what it means when the car is relisted. And, finally, an unfair trick played by too many sellers is that they list the car with a low starting price without a reserve (eBay charges extra for a listing with "reserve"), then wait to see how the bidding goes, and end the listing prematurely just before the closing moment if the highest bid is not high enough. Watch for phrases like "this car is advertised elsewhere". A few weeks later a new listing starts it all over again.
If the eBay auction time span is too short for you to arrange for a viewing, you could contact the seller near the end of the listing period. If the winning bidder drops out, as happens often, the seller may be willing to arrange for a visit before the car is relisted again.
 Specialist car auctions, such as Bonham's (UK), Barrett-Jackson (USA),
H&H (UK) or Catawiki (Internet) may generate much higher prices,
but the seller looses a significant portion because of the fees involved.
Although the auction houses carry prestigious names,
beware for the fact that they usually take no responsibility at all
for the car itself,
and often not even for its description as submitted by the seller.
See the
Glenmarch website
for an overview of auction prices.
Outside the UK you must realise that the "expert" of the auction house
may not have any knowledge of a DS420 at all.
On several occasions, American auction houses have published
absolute nonsense about a DS420 they offered for sale, such as
"a 1967 DS420" (Barrett Jackson, Scottsdale Az., Jan. 2004, lot 770)
or even "this Daimler was not originally built with a rear trunk"
(RM Auctions, Amelia Island Fl., March 2008, lot 207, and same car with same
quote again with RM Auctions, July 27, 2013, lot 166).
If a DS420 is offered for big money,
but the vendor or the auction house can not show a JHT Certificate
with the car,
you know that even the simplest form of verification was skipped.
Specialist car auctions, such as Bonham's (UK), Barrett-Jackson (USA),
H&H (UK) or Catawiki (Internet) may generate much higher prices,
but the seller looses a significant portion because of the fees involved.
Although the auction houses carry prestigious names,
beware for the fact that they usually take no responsibility at all
for the car itself,
and often not even for its description as submitted by the seller.
See the
Glenmarch website
for an overview of auction prices.
Outside the UK you must realise that the "expert" of the auction house
may not have any knowledge of a DS420 at all.
On several occasions, American auction houses have published
absolute nonsense about a DS420 they offered for sale, such as
"a 1967 DS420" (Barrett Jackson, Scottsdale Az., Jan. 2004, lot 770)
or even "this Daimler was not originally built with a rear trunk"
(RM Auctions, Amelia Island Fl., March 2008, lot 207, and same car with same
quote again with RM Auctions, July 27, 2013, lot 166).
If a DS420 is offered for big money,
but the vendor or the auction house can not show a JHT Certificate
with the car,
you know that even the simplest form of verification was skipped.
Comments on the Internet sometimes use the designation Mk-I, Mk-II, Mk-III to refer to a certain build of the car. These designations are mentioned nowhere in the factory published literature. Since the DS420 went through a more or less continuous range of modifications and upgrades, they are meaningless as well.
Never buy a DS420 for investment purposes. Rust never sleeps, so the car needs permanent attention. It is a general rule that after a few years of ownership you should be happy if the selling price gives you some reimbursement for the parts and other direct expenses that you have paid. Don't expect to see anything in return for the time that you have spent, unless you are so skilled that you can start with a wreck and convert it into gold.
If you look closely at how professional traders sell older classic cars, you'll notice that their cars either are superficially restored (hint: look for traces of fresh paint on the window rubbers), and still have an unpleasantly high price tag, or they are sold in unrestored condition. Very seldom you will see a professional dealer invest more than superficial up front, and hope to sell later with a profit. Only very exotic cars, with expected selling prices of six or seven digits, seem to be an exception to this rule. DS420s are neither exotic nor rare.
A thorough professional restoration takes so much time, and thus money, that you might be able to find an equally good (young) car in original condition for less. It just will take more time to find. If the money for an expensive restoration needs to be added to a sale, I would prefer to have this done under my own supervision, by a shop that I know and trust, instead of paying for a restoration done by the previous owner. On the other hand: a restoration under your own supervision will never be without surprises.
As an aside: only two cars were factory-built as landaulettes, with the roof above the rear bench replaced by a fold-away hood. Both these original cars have disappeared, so any landaulette that you find now is an aftermarket conversion. Since this conversion is very popular with wedding cars, chances are that you encounter them while you're searching. Be sure to study the landaulettes page on this site, to see the different ways in which this job can be done.
All DS420s have the famous Jaguar 6 cylinder XK engine, in 4.2 litre version. Jaguar made around 350,000 of these XK engines, from the early fifties until the mid-nineties. They were used in the XK120, XK140, and XK150 sports cars, in the first two of the three E-type series, the large volumes of XJ-style cars, and even in military vehicles such as Alvis light tanks, but the basic concept of the engine was kept the same. Therefore there are still many XK engines around, and a lot of business thrives on them. Replacement parts are still being manufactured, and several specialised revision companies exist.
In the USA, a car may have been converted to a GM or Ford engine plus gearbox, usually because specialist Jaguar mechanic skills are not widespread. The positive side is that these engines are more robust, and less sensitive to improper maintenance. The negative side is that outside the USA a Jaguar fan would not even touch such a car with a 6ft pole.
The first DS420s had the Borg Warner 8 automatic gearbox. Later (early 1974) the BW12 was used. Both have the selector lever on the steering wheel. The difference between the two can be seen on the plastic inlay in the selector display: BW8 has P-R-N-D2-D1-L and BW12 has P-R-N-D-2-1. From 1980 on, the General Motors 400 box was used, with the selector handle in the floor. All three are trouble-free units, and seldom need attention apart from the usual oil checks.
Other large mechanical parts, such as brakes, transmission, diff, water pump and exhausts can all be taken care of. Only the steering box may be difficult; more on that below. These parts are never cheap.
Alternators and starter motors are available, usually on an exchange basis.
Older DS420s have (always two) SU carburettors; in time sequence: HD8, HS8, HIF7, HIF44. Several specialist companies still cater for these carburettors.
Smaller components, from carburettor needles to various filters, thermostat, electric relays and switches, and heater fan motors are all being manufactured new. There is no computer nor other advanced electronics on board. Electronic ignition is available as a replacement for the unreliable contact-point type, although new contact points of the classic type are available as well. Even new fuel pumps can be bought; the (older) original fuel pumps, with contact-point mechanism, are notoriously unreliable. Various addresses are on my web links page.
Wheel rings and hub caps are manufactured new. Radiator grilles are often for sale on eBay; no breaker would throw them away. Do not believe claims that they cost thousands of Pounds; you should be able to find a decent grille, complete, for less than GB£100.-. Make sure to get the correct one of the several different types. The "flying-D"-ornament for the bonnet of the older cars is expensive; it may cost up to GB£250.-. Other chrome parts, such as bumpers, side strips or window surrounds may be more difficult to find, but not impossible.
Do not just start the engine! The pitfall is in the valve springs. During normal operation, the cams push the valves down (open), and the valve springs push them up again to close. While the car was "hibernating", the valves were in various positions. Now imagine an inlet valve that was down/open, whose spring is stuck by rust. If you fire up the engine, and its piston moves upward, the damage can be considerable: small chance, but large damage. So: always remove the cam covers (have new gaskets with you), pour fresh oil over the valves, remove the spark plugs, and turn the engine by hand until you are sure that all valves move up and down freely.
Turning the engine by hand is not easy. You'll need a socket tool 1 5/16" on the front of the crankshaft. That is the centre of the lowest pulley in the picture here below (the "thermostat housing" topic). Note that there is a retaining/locking strip on it; that must be removed first to give more grip to the tool.
If you plan to haul the car onto a trailer, make sure that the car's tyres will hold some air, or bring a jack and a spare set of wheels.
A weak point is the viscous clutch, located in the centre of the large fan on the front of the engine. This viscous clutch builds up friction as it gets hotter. If you try to turn the fan by hand when cold (give it a firm pull) it should turn less than one revolution. The friction-effect inside the clutch should be very noticeable, even with a cold engine. These clutches fail in two ways: either they get stuck (turning the fan means turning the engine; almost impossible by hand), or they become too loose. In the latter case a firm pull makes it spin several revolutions.
If the clutch gets stuck, the fan will make the same number of revolutions as the engine does. It will not stand that strain, and blades will break off. This may ruin your radiator and your bonnet. If the clutch becomes loose, the engine will not have enough "grip" on the fan: it will slip, and the cooling effect suffers. If you imagine that this same engine was cooled through the nose of an E-type, you understand how much spare capacity a DS420 has, but only as long as the car is in motion.
New fan clutches are available,
but their centre is approx. one inch thicker than the original ones.
They will not fit, at least not in older cars.
However, it is not too difficult to move the radiator one inch forward.
A bit of welding must be done to the radiator feet; it takes planning.
The water hoses will usually be large and flexible enough
to refit in the new position.
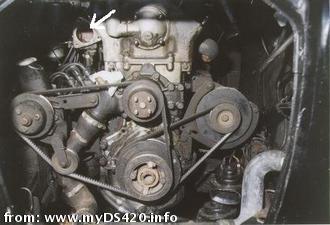
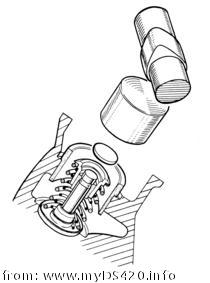
While you have the radiator and the fan out, you may be tempted to take the thermostat out to check it. The picture (click on it to enlarge) shows this after the removal. The thermostat fits in the empty space where the arrow points. But: the longest of the three bolts of the thermostat housing will invariably cause big trouble. It is the position just below the head of the arrow in the picture. If you get it out without breaking it in place, you're very lucky. Think in advance about the drilling skills and equipment you'll need to re-bore its passage.
A common problem is a leaking steering box, especially if the car has not been used for a long time. Because this is often neglected, and not easy to fix, the box wears out. This results in an inaccurate steering behavior; it is quite noticeable. As far as my information goes, this box is unique to the DS420, and RHD and LHD are different. Reconditioned boxes are available. They are expensive. The manufacturer of these boxes was Marles. The service manuals (on this site) have a lot of information: e.g. here and here.
Fellow DS420 enthusiast Craig Tiano provided the following comments on the subject of steering: "If the steering wheel moves up/down/left/right then have the steering column bushings checked (they wear out easily when you drive without tightening the curled ring to fix the column's adjustment). I've also seen a lot of DS420's with low mileage where the steering is "vague", usually because the pitman arm is worn. The steering box tends to start leaking from inactivity. Chances are a leaking one will stop leaking after driving it around a bit. When the steering box is going bad, you'll feel "bumpiness" when turning it while stopped. If you feel this effect, you should not drive the car as it is now unsafe. The bumpiness is caused by the ball bearing race being worn out; when the race is worn, the balls start to fall out, resulting in a completely locked steering system. Ask me how I know! Fortunately, this happened in my driveway and no damage to myself or the car occurred."
The filler necks of the two petrol tanks are covered by body flaps. These flaps are not rain-water tight, so water gets through. The cavity has a drain hole, with a small hose running down alongside the petrol tank, and ending through a hole in the bottom of the car, just behind the wheel arch.
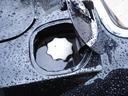
Actually there are two drain hoses on each side of the boot. The other one is for the water that came down the rear window, and got trapped in the upper slit of the boot lid. The slit has a perforated side wall, leading the water into a collector bin, located between the hinges of the boot lid. The collector bin drains via another rubber hose (on each side) which runs roughly in parallel with the drain hose of the fuel filler cavity. But let's concentrate on the fuel filler drain: the problematic one. It blocks, and the water in the cavity rises until it enters the tank. Stories of DS420 owners stranded by this problem are numerous!

You should make it a high priority job to clean both fuel tanks soon after you have purchased the car. Dispose of the fuel content; it will most probably be contaminated with water. Getting the tanks out is not difficult. The vertical chassis bar in front -which, on one side, holds the jack and the spare wheel- is easy to unbolt. Then you apply some force to remove the rubber connection from the neck of the tank. It is a sturdy piece, so you don't have to be careful there. Unplug the wire connectors from the fuel sensors, after you have taken note of which wire colour goes where. The black wire -earth- goes in the centre. The other wire may be "live" when the ignition is on, so make sure to insulate its connector while it hangs loose. Do not take the fuel sensor out of its fitting. It is very hard to refit leak-free, and you'll need a new rubber ring first. Be careful not to break the long thin ventilation hose that is mounted on the top of the tank. You may want to unscrew it first; don't loose the foam plug that's inside it.
While you are at it: note how far the filler neck extends above the ventilation hose. Do you remember your first time with the car at the petrol station, and how the petrol was already splashing on the ground below the car, long before the automatic nozzle shutter of the pump became engaged?
Do not unscrew the thin fuel hose that goes from the tank to the petrol pump. That one should be detached from the pump, not from the tank. The tank side is much harder to refit leak-free because it sits lower. Note that the connection on the pump is with a so called "banjo-bolt" (you'll understand when you see its shape). Some versions of this banjo-bolt are asymmetric: one side then has a circular groove, the other is smooth. Note the proper sides when you unbolt it (smooth side goes against the housing). To refit later, you must put a new ring (alu, fibre) in the groove.
If any part of the fuel lines is still made of that semi-transparent yellow plastic material, then replace it a.s.a.p. by a suitable rubber hose. The old plastic material when under pressure is a ticking time bomb (only for the ventilation hose it is still OK because that normally is empty).
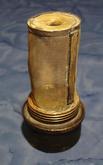
Once you have the tank out, it is a good idea to unscrew the bottom drain mechanism; see picture. This will make the cleaning much easier, and refitting it is without pitfalls as long as the rubber ring is still OK. The copper mesh on the bottom mechanism is your first line of defence against all the crud that settles in the tank; very important! Make sure that it is free of holes and tears.
You should renew the paper element of the fuel filter. It is located in the engine compartment, in a glass bowl on the firewall behind the engine. Beware: you can't get it out without spilling some petrol, and dropping the glass bowl isn't a good idea either. New paper elements are readily available, and not expensive. As an initial purchase, I recommend that you buy at least three. Cleaning the tank will inevitably disturb the rusty layers inside, and you won't be able to get that all out at once. So it is better to replace the filter again a few weeks after your tank cleaning operation; the first time my own car was brought home on the back of a removal truck was because I had neglected this. Finally you keep the third one as a spare. Very rusty or even leaking tanks may be surface-sealed with a special plastic compound. It is poured in in liquid form, and solidifies as a film against the inside wall.
The car is perfectly driveable with one tank removed. Each pump automatically serves as a one-way valve to block the pressure of its twin, but be sure to check this. If it doesn't, that means that that pump won't do its own work properly either.
If you ever have to remove a pump, the remaining fuel line must be locked: put the smooth side of a fitting drill bit into the hose stub (a bolt may leak along the thread), and a clamp around it. The other pump will build up a lot of pressure there. The switch on the dashboard is to supply power to either the left pump+sensor, or to the right pump+sensor.
And of course you clean or renew the water drain hoses
from the filler flap down.
Check that they actually leave via the holes in the bottom of the car.
The hoses have a tendency to creep upward,
and you can imagine where the water goes then.
That's why the "bad spots" list here-above mentions the bottom
under the petrol tanks as an area requiring special attention.
Make sure to check the drain after you have (re-)installed the tank;
the tank has a sharp flange that can easily push the hose shut.
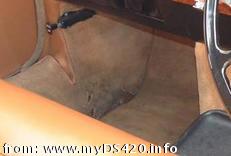
When you open a front door, you'll see two water collector bins (one on the door, one on the post), right above the top hinge. The one on the post has a drain hole in front. A metal pipe passes through the door post, horizontally, ending in the engine compartment. That end is sort of hidden in a far corner. Look deep behind the battery; you may even want to take the battery out first for a thorough look. From there, a rubber draining hose goes down into a very hard to reach area between the front door post and the front wheel arch (behind the rotten carpet on the picture). The hose should end under the car. It probably is damaged or disintegrated near the end, and water will leak inside the body. Renew those hoses, left and right. Then check the horizontal metal pipe for leakage; look through the holes between the door hinges. If it leaks, you've got a real problem.
Another difficult area is below the last wind-down window, next to the passenger bench. This type of window is only present in very old cars; from 1972 on it was replaced by a hinged window; pictures on my "Model changes" page show the difference. With the wind-down window, water will leak into the body, and end up inside the sill. There are small drain pipes deep inside the sill, as you can see in the photo-gallery of this site, where photos of the restoration of my own car are shown and where the complicated internal construction can be studied. The message here is: make sure to have open drain holes in the bottom of the sill! Although it is a good idea to spray waxoil into the sill, realise that not every cavity wiil be reached if you only spray via holes from underneath. And too much waxoil may easily clog the drain pipes inside the sill. If you ever take out the rear bench and its arm rests, then use the occasion to spray wax from above as well.
The upholstery is not difficult to service. My "colour & trim" page has several addresses where suitable almost-original material can be bought. But material that is sourced by the company that does your restoration will often be a good substitute,
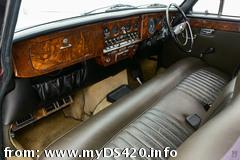 The walnut burl veneer is worth an extra look.
Veneer patterns show an enormous variety.
Daimler had the "one car, one tree" principle, which means that all veneer
in a car came from the same walnut tree batch
and thus has a uniform pattern overall.
This typically is something that goes unnoticed
until it has been tampered with,
and a single reveneered panel often sticks out like a sore thumb,
as the glove box cover on the photo clearly shows (right; click to enlarge).
As a cost cutting operation, a previous restoration may have stripped off
all walnut burl veneer and left the underlying birchwood grain surface
exposed. You'll have to make up your own opinion on that.
The original varnish on the woodwork of my 1972 cars came off relatively easy
with chemical paint stripper (remover).
But I have seen woodwork from the eighties where the varnish was "immune"
against these chemicals.
Some people then recommend stripping with a heat gun.
For a DIY restoration of the veneer I have used clear yacht varnish,
gloss type, and am very
satisfied with the outcome
and here.
Count on at least half a dozen layers to be applied,
and have the top layer sprayed by a professional!
The walnut burl veneer is worth an extra look.
Veneer patterns show an enormous variety.
Daimler had the "one car, one tree" principle, which means that all veneer
in a car came from the same walnut tree batch
and thus has a uniform pattern overall.
This typically is something that goes unnoticed
until it has been tampered with,
and a single reveneered panel often sticks out like a sore thumb,
as the glove box cover on the photo clearly shows (right; click to enlarge).
As a cost cutting operation, a previous restoration may have stripped off
all walnut burl veneer and left the underlying birchwood grain surface
exposed. You'll have to make up your own opinion on that.
The original varnish on the woodwork of my 1972 cars came off relatively easy
with chemical paint stripper (remover).
But I have seen woodwork from the eighties where the varnish was "immune"
against these chemicals.
Some people then recommend stripping with a heat gun.
For a DIY restoration of the veneer I have used clear yacht varnish,
gloss type, and am very
satisfied with the outcome
and here.
Count on at least half a dozen layers to be applied,
and have the top layer sprayed by a professional!
Think twice before embarking on such an operation. You'll need a new dashboard and thus the veneer pattern will notably differ from the pattern in the rest of the car's interior. Then make sure that you'll be able to source a LHD steering box. That won't be easy. Remember: only 200 (approx.) LHD cars were built during the entire life span of the model.
Incomplete conversions often don't change the screen wipers (wipers in rest must have their top at the driver's side), the position of the hand brake lever (to be moved to the other side of the transmission tunnel) and the position of the row of switches in the centre of the dashboard (positions must be swapped because you don't want the switch for the screen wipers to go out of reach. But the labeling texts must be swapped as well. A strip with the labeling texts in LHD positions will be impossible to obtain; although you could try Jaguar MKX, 420G, 420). In general, it may be a good idea to scan through one of the parts manuals on this website to get a full overview of parts that differ between RHD and LHD cars.
Once you have the car at its new home, the first thing to do is to renew all body fluids, preferably the diff oil included. Check the drain of the fuel tank fillers, and clean the tanks. Make sure that the fuel lines are made of modern material. Take the rear window out, clean the rubber and the surround, and refit with new sealing compound. Same, but less urgent, for the front window. New brake pads, a new battery and new tyres are next. Check the engine mounting rubbers. Don't forget to obtain a set of spare keys (do it!). Then you can start working on the rusty underbottom, and the clean-up of the interior ....
For starters: my experience here is almost exclusively with older cars. The following remarks may not be applicable to cars from the eighties.
It is very unlikely that you'll find a car with its original paint coat in good condition. The vast majority of all cars was sold in black, with black over Carlton grey as a good second. All wedding companies now have their cars resprayed; only funeral directors keep them in their original black colour. If a two-tone scheme involved black, the lighter colour was often put on the lower part of the body. It makes the car look more slender. The division between two tones always was between the bonnet and the rest. The lower edge of the bonnet has a chrome strip, which continues towards the rear of the car. That is the dividing line; see an example here. If the colour separation is near or in between the head lamps, this may not be original, although one factory-issued press photo shows it differently.
The original cellulose paint on older cars was of exceptional quality. VandenPlas sprayed several layers of heavily diluted lacquer, which resulted in an almost mirror-smooth surface (and lots of thinner fumes). The VandenPlas log books often mention the extra percentage of dilution that was added to the paint of a particular car. You may take a fluorescent light, bar type and as long as possible, and look at its reflection on a flat part of the car's body. Move the lamp back and forth, and look at how sharp the long edges of the light are reflected. On any modern car the reflecting edge line will wobble, but on the original paint of a DS420 it will be almost razor-sharp.
A respray in cellulose lacquer is not easy. In many countries it is now forbidden, or permitted in specialist paint shops for restoration only. Also, this lacquer is much softer than a modern one, difficult to clean, and much more vulnerable to scratches and other damage. If you plan to drive the car regularly it may not be wise to pursue this old paint. But its deeper and softer glow is unsurpassed.
With thanks to Craig Tiano for the inspiration and for his helpful comments.